First steps. All terminal boot ways.
WTware includes operating system and all needed drivers. That's why WTware works without Windows and can't be started "from Windows". WTware runs on a computer with no operating system.
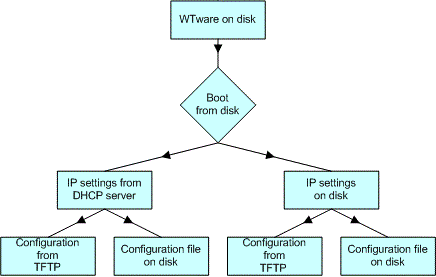
WTware can be boot by any way you can technically boot computer. During boot WTware:
- Loads it's binaries from disk or downloads from TFTP server by network.
- Reads from disk or receives from DHCP server by network IP-address and other network settings.
- Reads from disk or receives from TFTP/HTTP server configuration file.
Firstly you are to choose WTware terminal boot way. You may boot:
by network, the best on practice way
from USB flash disk, the easiest way
from CD-ROM
from hard disk
Boot by network
WTware is designed for boot by network. It's the most optimal way for mass application. All terminal configuration may be performed from server, WTware version upgrade may be done by one click, no additional boot disk needed on terminal.
For network boot DHCP and TFTP service must work. In the easiest way, if you don't have your own DHCP in network and during Wtware installation you didn't forbid WTware DHCP and WTware TFTP services installation, all needed services already work on server. If you have another DHCP, configure it.

After WTware installation on server (and DHCP configuration, if you're using third-party DHCP server), connect computer to network, choose network boot in BIOS, everything should work now.
Boot from USB flash disk
Install WTware to USB flash disk using "Boot from USB" utility in WTware configurator. It's the most simple way to run WTware, for when using boot from USB flash terminal may store all it's settings on boot disk and may not depend on network services.
When terminal starts from the flash-disk you can edit configuration file or specify that it should be downloaded from TFTP server. Also you can select whether to IP parameters should be received from DHCP by network or stored on the disk. Press Del during boot to access terminal configuration menu.
Boot from CD-ROM
Create boot CD Image using "Boot from CD" utility in WTware configurator. Boot from CD-ROM is convenient, for nobody never will change anything. Every boot terminal will start with the same settings as before. But to upgrade to new version you'll have to rewrite disk.
Boot from hard disk, IDE-flash, Disk-On-Module
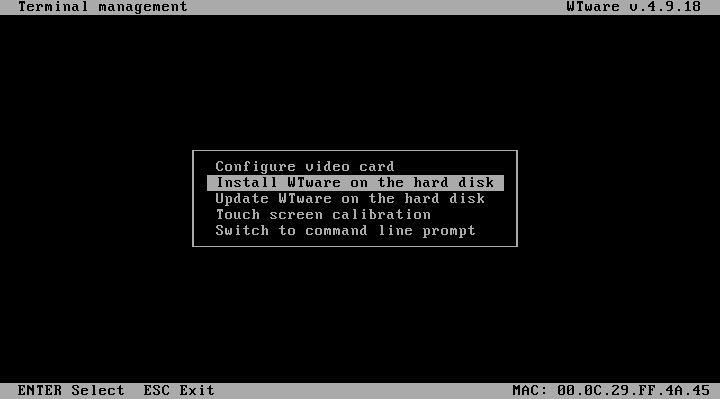
WTware can be installed on hard disk. WTware installation requires at least 64Mb hard disk, i.e. IDE flash-disks will do perfectly. Remember: WTware installes itself on a hard disk, and there's no any other way to install it now. I.e. to setup (and upgrade versions further) you are to boot the terminal using any other way: from CD-ROM, USB-flash or by network. After that press Del during terminal boot and select menu item "Setup WTware on hard disk":