Fast start! WTware configuration for network boot. Diskless terminals.
In this article is described the fastest way to boot diskless computer and connect to the Windows terminal server. How to perfect obtained solution you'll see later.
Please, follow the instructions in this article exactly as they are. If on some step you'll get not the same result as described it's better to stop and find an error. Possibly it's worth to contact WTware techsupport then. We advise not to make experiments and improve the scheme until you'll get working model.
Initial conditions:
- There is a server with Windows 2003 Server (or with Windows NT 4.0 Terminal Server + service pack 6, with Windows 2000 Server + Servicepack 4) and a launched terminal service. Please, make certain that the connection by standard Microsoft client to the terminal service works correctly.
- There is a terminal — a computer, that satisfies all the demands from hardware compatibility list.
- These two computers are connected by LAN.
- There is a launched and activated terminal services licensing server in the network. In some cases the terminal service rejects WTware terminals connections without this service. That is the service, that causes the terminal server to reject connections from any clients after 90 days.
There are many ways of computer network boot. The main point of all these ways is the same: during the boot some bootstrap loader should be executed on the terminal. It's a kind of a microprogram that completes BIOS's functionality with boot by network.
Now we'll use a loader on floppy. Later on you can use any other way, but for the first time it's the simplest one.
Network boot is performed in such way:

Instruction:
1. Download:
- ebnet522.img, floppy image with the universal loader.
- rawwritewin-0.7.zip, a program for writing the image to a floppy.
- Last version of the tftpd32 utility from developer cite.
- WTware package for network boot.
2. Write by the rawwrite program ebnet522.img loader image to the floppy.
Boot the terminal from this floppy (arrow ![]() on the scheme). Firstly on the screen you'll see such lines:
on the scheme). Firstly on the screen you'll see such lines:

Then the loader tries to detect the network card. If it's a success then the request to dhcp-server will be performed (arrow

3. Make dhcp-server. Two services — dhcp and tftp — are required for network boot. At first it's easier to use tftpd32 utility to perform the functionality of these services. It has all the needed functionality, easy-to-setup and configure, keeps query log.
If in the network there's a dhcp-server, then configure it instead of making a new one. Two dhcp-servers can't work at once in one Ethernet network segment.
For Microsoft dhcp included into Windows distributive two parameters should be specified: 066 (Boot Server Host Name — tftp-server ip-address), and 067 (Bootfile Name —
wtshell.nbi). Look at the next article.For ISC dhcpd unix-server add these magic words in the configuration file dhcpd.conf:
next-server tftp-server-ip-address;
filename "wtshell.nbi";
Configure tftpd32 main window in this way:

Important fields:
Server Interfaces: ip-address of the server network card that looks at the terminal.IP pool starting address: starting IP-address of free address pool in the network, where the terminal and the server are.Size of pool: the amout of this pool (specify at least 10).
Boot File: typewtshell.nbihere.Mask: mask of the network, where the terminal and the server are.
Then press "Settings" button and configure tftpd32 in this way:

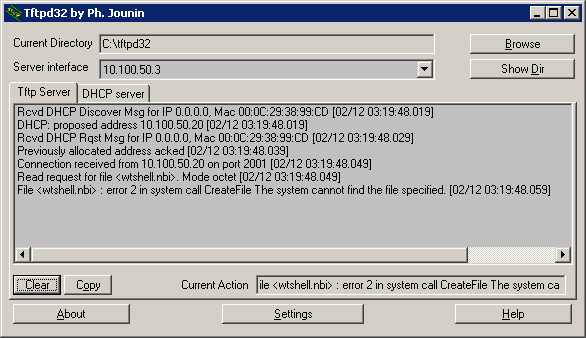
4. Restart the terminal. After that on the tftpd32 utility tftp tab appears such text:

And on the terminal screen such lines should be printed:
First two lines correspond to the arrow ![]() on the scheme.
The last one is a request for WTware to load (arrow
on the scheme.
The last one is a request for WTware to load (arrow ![]() on the scheme).
on the scheme).
Then the terminal will print "TFTP error 1 (File not found)". As now it should be so.
5. Configure tftp-server. Unpack the wtware.?-?-?.network.en.zip
archive to the disc C: so that the full path to wtshell.nbi would
be: c:\wtware.net\wtshell.nbi. In tftpd32 press Settings button, then Browse and
choose folder c:\wtware.net. Then restart the terminal again.
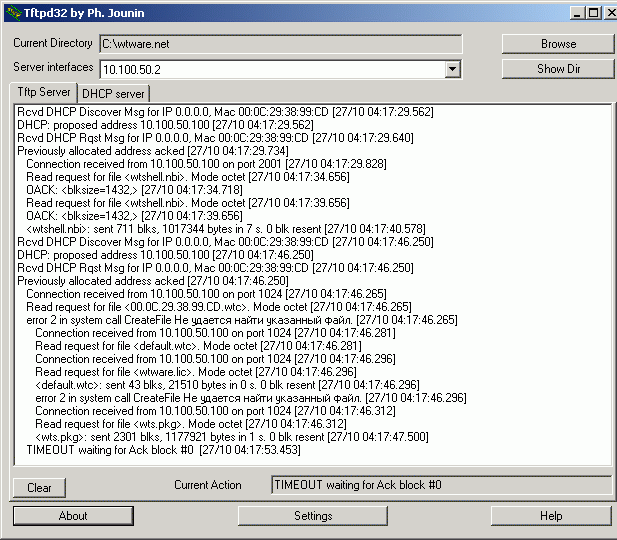
On the tftpd32 utility tftp tab these lines should appear after that:

And on the terminal screen appears:

Successfull network boot, arrow ![]() on the scheme!
on the scheme!
6. Configure WTware parameters in the file default.wtc, WTware
configuration file:
- Be sure to delete symbol
#in the line
and specify the terminal server ip-address instead of# win2kIP = 10.100.50.210.100.50.2. - If you use not PS/2 mouse, then necessarily set
mouseparameter. - If wheel mouse used delete symbol
#in the line
# mouse_wheel = on
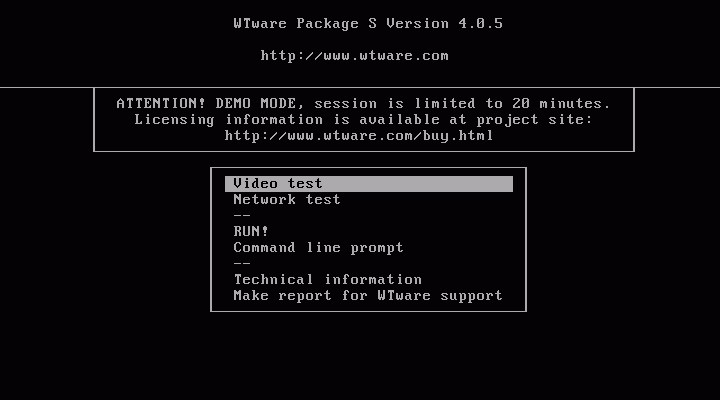
Restart the terminal. Terminal screen should look like that:

7. Test video driver. Choose first menu item, "Video test". On the terminal screen should appear:

Colors should be in the same order as on the screenshot. While mouse moving the cursor with white WTware logo moves on the screen.
8. Test network. Run menu command "Network test". On the screen will appear:

Of course, should be your terminal server IP-address, the same as specified
in the win2kIP parameter of the default.wtc configuration file.
And you should see text "1 packet received, 0% packet loss".
9. Run. Run menu command "RUN!". On the screen should appear Windows login window.
As a result: computer boot with no harddisk, you can work with Windows terminal server. You've got a working stand. Now you can change the scheme to make it more convenient and functional. Read the next article!